Solving Dull Imported RAW Photos in Lightroom
I've been using Adobe Photoshop Lightroom for quite some time now to fulfil all my photo conversion and tweaking needs, and I really like it. However one thing that kept annoying me was the fact that the images I imported came out dull when compared to how they appear in the camera viewer or how I remember the original scene. This meant I had to go through each image and tweak the settings to get something close to how I expected the image to come out, which is very very time consuming. These same images came out fine when processed by Nikon's Capture NX first.
I shoot in RAW format on my Nikon D50 so I can do more post-processing if I need to, and that's the operative phrase - "IF I need to". I'm not the best photographer in the world (yet ;-) ), but I know when I've taken a picture I really couldn't get wrong, so it's quite frustrating to find I still need to tweak it to make it presentable.
Well, this weekend I decided enough was enough and turned to Google to find out what I could do about my dull imported RAW files without having to give up using Lightroom or adding any additional steps to my workflow.
 It wasn't long until I stumbled upon this great post that told me everything I needed to know.
What I wasn't aware of was the fact that Adobe has actually been working on putting together a set of camera profiles for use with Lightroom. These aren't supplied with Lightroom yet as they're still in beta but can be downloaded from Adobe Labs.
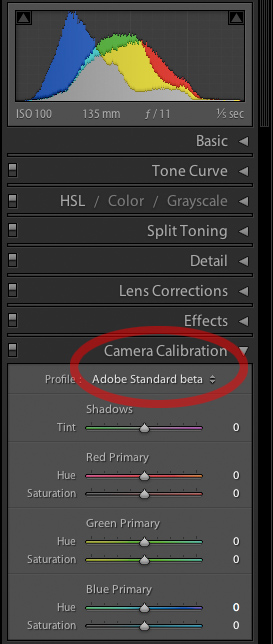
Once downloaded, installed and Lightroom restarted I was able to set the appropriate profile in the "Camera Calibration" section of the Develop section as follows:
- Select an image from that camera, and enter Develop.
- Press the Reset button in the lower right.
- Choose the profile you'd like to be the default (in the Camera Calibration panel)
- Hold the Alt/Option (⌥) key. The Reset button will change to "Set Default..." Click it.
- Restart Lightroom.
Your profile will now apply to all images you import for this camera in the future, however it won't apply to those already imported. You'll need to copy the calibration setting to your already imported images as follows:
- Perform steps 1 - 3 from above.
- Go to Settings → Copy Settings in the menus (⇧⌘C on a Mac)
- Unselect all checkboxes except the Calibration checkbox and click Copy
- Go back to Library and select all the images you wish to apply the calibration to
- Go to Photo → Develop Settings → Paste Settings (⇧⌘V on a Mac)
Your calibration should now be applied to all your selected images.
At the moment only Canon and Nikon profiles are provided and the Nikon profiles are as follows:
Standard, Neutral, Vivid, Landscape, Portrait, D2X Mode 1, D2X Mode 2, D2X Mode 3. Just select the one that matches the "Optimize Image" (or equivalent) setting within your camera.
This finding helped me turn around my recent holiday snaps in record time.